God’s blessing
Most of those who created a blog or a site that suffers from heavy browsing and slowed the site madly, today we will explain the addition that will speed up the site and compress your photos and codes.
Table of Contents
What is wp Rocket?
WP rocket is a WordPress caching utility that is extremely effective in speeding up your website loading time.
Website creation: How to create a successful blog and profit from the Internet
Advantages of wp Rocket?
WP Rocket instantly applies 80% of best performance improvement practices.
There is no need to adjust it; Once activated, your website will immediately benefit from:
The desktop and mobile static cache is the static HTML version of your content.
Browser caching: This stores certain types of files on the local computer for visitors.
Cross-Origin support for web fonts (Apache).
Discover and support various plug-ins, themes, and third-party hosting environments;
A mixture of included and third texts.
WooCommerce Shopping Cart Cache Update.
WP Rocket automatically takes care of all of this, so you don’t need to touch the icon to make your site faster. Simply enjoy immediate improvement in load time along with the best GTMetrix and PageSpeed results!
At the same time, if you prefer to customize its settings and make the most of the power of WP Rocket, you have a wide range of advanced options to choose from: slow loading of images, preloading of XML map files, optimization of Google fonts, CSS and JS miniature, delayed loading of JS files and improvement Database and much more.
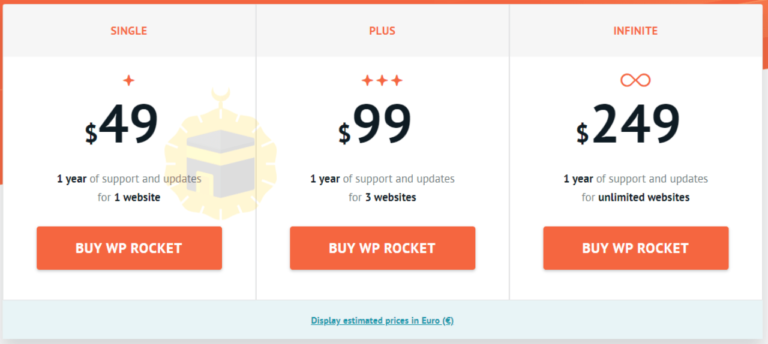
To take advantage of all of this, choose between one license ($ 49 USD for 1 website) or 1 license ($ 99 USD for 3 websites or an unlimited license ($ 249 USD for unlimited websites). All licenses include one year of support and updates.
WP Rocket plans and pricing:
- $ 49 / year – 1 year of support and updates for 1 Site.
- $ 99 / year – 1 year of support and updates for 3 websites .
- $ 249 / year – 1 year of support and updates for unlimited websites.
1. Download and install WP ROCKET
First, head over to the WP Rocket site
Choose the plan that suits you and complete the necessary steps to submit your application.
After that, an email with login information will be sent to your account at wp-rocket.me. Go and log in, and “My Account” will find the download link. Download and save a zip file on your computer.
After that, log in to your WordPress account, go to Plugins -> New -> Download Plugin.
Simply download and install the zip file version of WP Rocket.

There are many sites and ways to work and bring traffic from the Internet. For more information, read the following article:
2. Best practices for configuration wprocket
Now it’s time to configure WP Rocket according to the recommended settings.
First go to settings -> wprocket, you will be taken to the plugin settings page. There are 10 tabs or sections you will need to configure and a settings disk:
– Control Panel (default tab)
– Cache settings
– CSS and JS optimization settings
– Media settings
– Preload settings
– Advanced rules settings
– Database settings
– CDN settings
– (Cloudflare) Extensions
– Tools
When testing options in WP Rocket, please use the following process:
Activate options one-at-a-time, not everything at once
After each option that you activate, check your site in a browser window where you are not logged in to WordPress. An incognito/private window works well. By doing this you will be able to see immediately if a particular option causes any issue.
Check a few types of pages on your site. If anything doesn’t look right, don’t panic! Disable the last option you activated and your site will return to normal.
Getting started with configuration
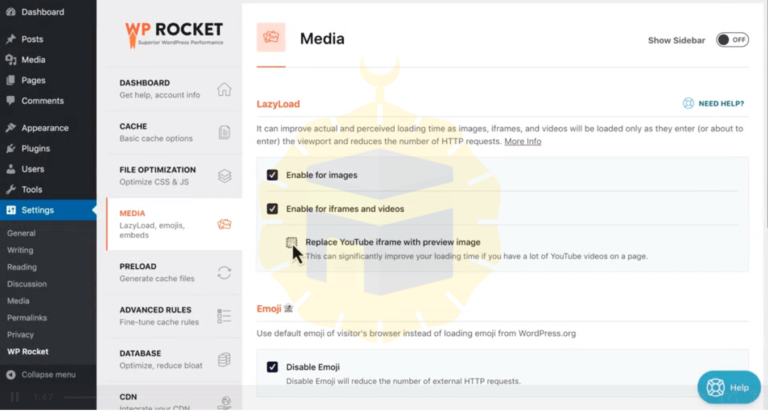
Media > LazyLoad
We recommend activating LazyLoad, because it helps reduce the negative performance impact of images, by loading them only as the visitor scrolls down the page and actually needs to see them. You can read more about this on our blog.
Cache > Mobile
If you have a responsive theme, we also recommend enabling Mobile cache to apply all optimizations for mobile users as well.
File Optimization > Basic Settings
In most cases you can also turn on Minify HTML, Remove query strings and Combine Google Fonts files. You won’t see a dramatic impact on load time, but they are considered best practices.
File Optimization > Minify/Combine files for CSS/JS
Minifying your CSS and Javascript files to remove whitespace and comments is a best practice to help reduce their file size. It might improve your “performance grade”, but it does not always have much of an impact on your actual load time.
The Combine CSS files option takes all the CSS files on your site and combines them into a single file. So if you had 10 CSS files before, you’ll now have 1.
Combine JS will combine all your JavaScript files, including the inline scripts, then load the combined file at the bottom of your page, so it doesn’t block the rendering of the page.
Now, combining files may improve your score, but it may not improve the actual speed. That’s especially true if your site uses HTTP/2. So, it’s really important to check the speed with and without the combine options to find the right configuration. If you’re not sure whether your site uses HTTP/2 you can use an online tool to check, or ask your host. It’s also possible that your CDN supports HTTP/2—even if your own server does not.
File Optimization > Optimize CSS Delivery
This is an advanced option, and it may not be appropriate for every site. It really depends on how your site is built. When you activate this option, our external tool will visit each type of page on your site and generate the critical path css. This helps the perceived load time of your site.
File Optimization > Load JavaScript Deferred
Deferring JavaScript ensures that it won’t block your page as it’s being rendered. And, “Safe Mode” means that the main jQuery file won’t be deferred. Many plugins rely on jQuery, otherwise some functions on your site may not work. If you uncheck this option, check your site carefully. Make sure all the interactive elements of your site—like your slider or menu—are working properly after you activate these JavaScript-related options.
With this we have completed the explanation. For more information, we invite you to read the various articles on our site:


